Digital Overlays

Friday 9 August 2019

How to Remove A Black Background From Jpeg Overlays

JPEG Overlays sometimes have a Black Background, unlike most .png files, which have a transparent background.
  • You will need to use your Blending Modes in photoshop for the JPEG Overlays to work. 

  • Blending Modes are fantastic tools that change the way the layer interacts with the layers below it. 

  • If you are struggling with using my JPEG Overlays, like the sun flares or glitter, and can't work out how to get rid of the black background, there is a very simple solution!  Yay!

  • The blending mode needs to be changed to SCREEN! Voila!  All the black disappears! 

  • You can transform your overlay now, to fit and suit your image.


How to Install Lightroom Presets

I use the latest version of Lightroom. Actually, I usually use Camera Raw for my starter edit.
I have always found it to be pretty much the same as Lightroom, and finally, when Adobe released the latest versions of LR, they matched up the file names too.  
All  Presets are now .xmp files.  The old format for saving your presets was .lrtemplate. I often wondered why they made the presets for Camera Raw and LR different, since the programs were pretty much the same thing.  Well, it's a good change and now I can save all my old camera raw settings in Lightroom. An added bonus, if you ask me!

So, for any of the LR Presets that I sell ( which are .xmp files for the new version of LR ) follow the below instructions...
  • After unzipping the product files, locate the folder containing .XMP files.
  • Go to View > Edit Panels > Preset Browser
  • Click the ... icon in the Presets Browser. Click Import Presets...
  • Locate your .XMP presets in the file browser.
You can now begin using your presets! They'll be found under User Presets in the Preset Browser.


How to Use .Png Overlays


These are super easy to use, and can be quite addictive!!
  • Select the overlay to add to the image by going to File > Place Embedded.
  • Find the overlay you wish to use and click Place.
  • Resize/reposition to fit as needed and apply changes.
  • You don't need to change the blend mode on .png overlays. Some, however, do look nice with a changed mode, like Screen, to make things brighter and more transparent, or Multiply, to make the overlay darker.
  • Adjust opacity as desired.
  • Adding a layer mask will help keep the overlay looking realistic, especially with the wing overlays
  • Remove some of the encroaching overlay from your main subject.


How to Use Clipping Masks In Photoshop

Clipping masks are great!  Especially when you are digital scrapbooking or want to create a special card or feature frame for your photography.
They are also incredibly simple to do!
The most important thing to remember is you can only clip your image to the mask in the layer BELOW. So always keep the photo you want inside the frame in the layer ABOVE the clipping mask.

    To create a clipping mask...
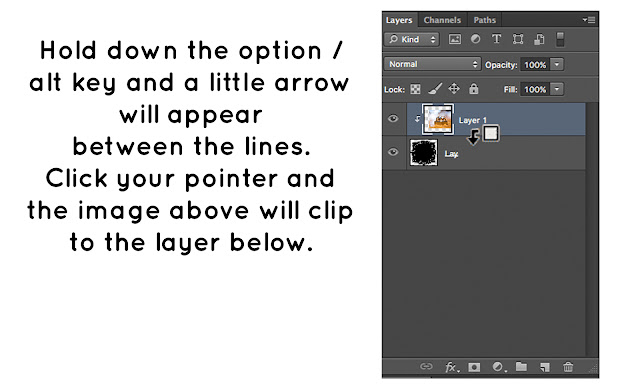
    • Hold down Alt (Option in Mac OS), position the pointer over the line dividing two layers in the Layers panel (the pointer changes to two overlapping circles), and then click.
    • In the Layers panel, select the top layer of a pair of layers you want to group, and choose Layer > Create Clipping Mask.

    To use one of my pre made clipping mask frames...
    • Hold down Alt (Option in Mac OS), position the pointer over the line dividing two layers in the Layers panel (the pointer changes to two overlapping circles), and then click.
    Below is an example of how to clip your image to one of my frames.


    How To Add Textures In Photoshop

    Textures are a fabulous way of adding colour, depth and interest to your photography. 
    I create my textures with photographers in mind.  So you will often find they have more depth towards the edges and less towards the middle. ( Assuming we mostly centralise our main subjects.  I find they work best as backdrops or at a lower opacity when used on portraits and they can go full on with nature images.
    How To Add Them.
    • First, start by loading your image into Adobe Photoshop and make sure you are editing in high resolution. eg. 240 - 300dpi.
    • Place your first texture file (File –> Place –> Choose Texture File). 
    • Transform the texture to fit your image. ( I have more details regarding using the Transform tool in the Help Centre if you are looking for help with it. )
    • Adjust the blending mode. I often use multiply, screen, lighten, or overlay. Adjust the opacity and add a layer mask.
    • Use the layer mask to remove a bit of the Texture from your main subject with a black brush on a white background.
    • Flatten and save your finished work.